

How To Put Picture Behind Another In Photoshop

Placing An Epitome Inside Of Another With Photoshop CS6
In this tutorial, nosotros'll acquire how to identify 1 image inside of another to create interesting composite furnishings using Photoshop'due south simple withal powerful Paste Into command. With Paste Into, we tin select an area in one image, so copy and paste a 2nd image directly into our selection. For this tutorial, I'll be using Paste Into to place a photo within a moving-picture show frame, but as with all of our Photoshop tutorials, the goal hither isn't just how to create this one specific effect. One time you've learned how the Paste Into command works, yous'll no doubt discover plenty of other creative uses for it on your own.
I'll be using Photoshop CS6 here but this tutorial is besides fully compatible with both Photoshop CS5 and Photoshop CC (Creative Cloud). For CS4 and earlier versions, or for some other example of how Paste Into tin can be used, you'll want to bank check out our original Placing An Image Inside Of Another tutorial.
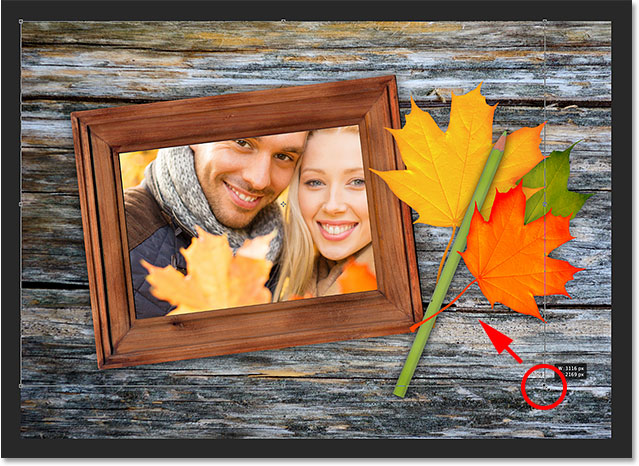
To create this effect, you lot'll demand two images. Hither'southward my starting time one (the epitome containing the picture frame) (autumn frame photo from Shutterstock):
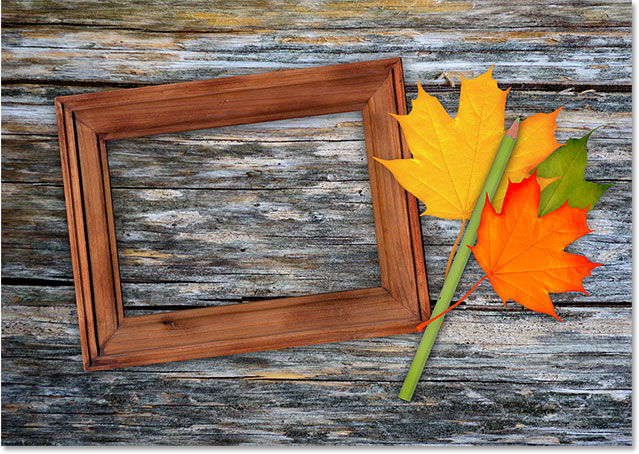
The first epitome.
Hither'due south my second image (the photo I'll be placing inside the frame) (couple in fall park photo from Shutterstock):
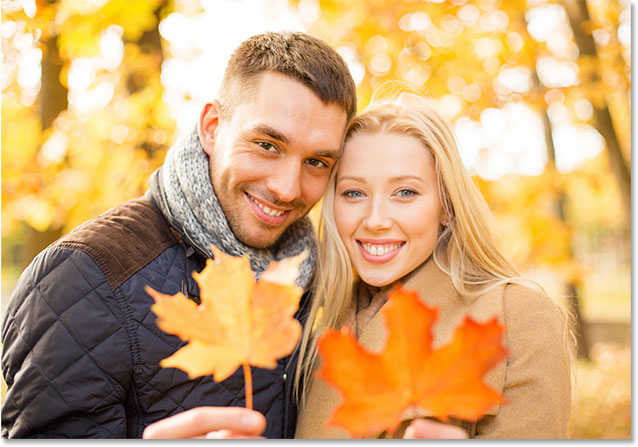
The second image.
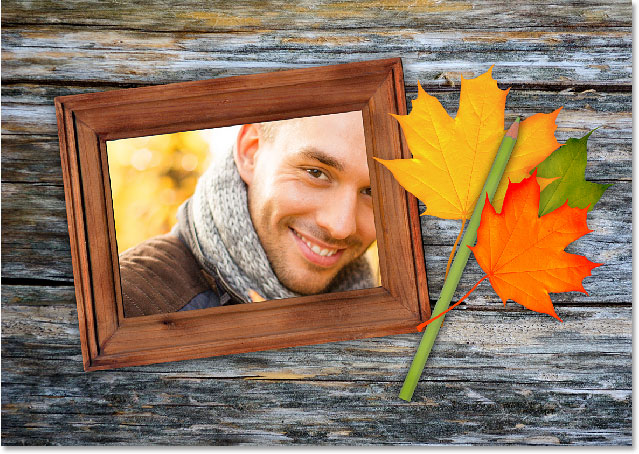
And here's what the final blended will look like:

The final event.
How To Identify An Epitome Within Of Some other
Stride 1: Select The Area Where You Want The Second Epitome To Appear
Beginning with the image yous'll be placing the second image into and depict a selection around the area where the 2nd image should appear. The actual selection tool y'all demand will depend on the shape of the area. In my case, I'm starting with the image of the flick frame and I want to place my second image into the frame. The frame is a uncomplicated rectangular shape so you might recollect the Rectangular Marquee Tool would work. Nonetheless, the frame is also tilted on an angle, then a meliorate option here would be Photoshop's Polygonal Lasso Tool.
Past default, the Polygonal Lasso Tool is nested behind the standard Lasso Tool in the Tools panel. To access it, I'll click and hold on the Lasso Tool's icon until a fly-out bill of fare appears showing me the other tools hiding backside it. And so I'll cull the Polygonal Lasso Tool from the menu:
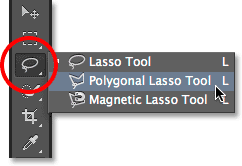
Clicking and holding on the Lasso Tool, then selecting the Polygonal Lasso Tool.
See all of our Photoshop Pick Tool tutorials
The Polygonal Lasso Tool lets the states draw direct-sided polygonal selections by simply clicking at the points where the direction of the choice outline needs to alter. Each time nosotros click on a new point, Photoshop adds a straight line between the new point and the previous signal, and nosotros continue clicking around the expanse we're selecting, adding a new line segment with each click, until we've made our fashion back to the beginning. To complete the pick, nosotros just need to click once again on the initial bespeak.
Selecting the surface area inside the motion picture frame with the Polygonal Lasso Tool is like shooting fish in a barrel. All I need to do is click in each of the iv corners. I'll get-go past clicking in the upper left corner, and then I'll move across to the upper right corner and click, down to the bottom right corner and click, and then back across to the lower left corner and click. You lot won't meet the traditional "marching ants" option outline equally you're making a option with the Polygonal Lasso Tool. Instead, you'll see a thin path outline joining the points together:
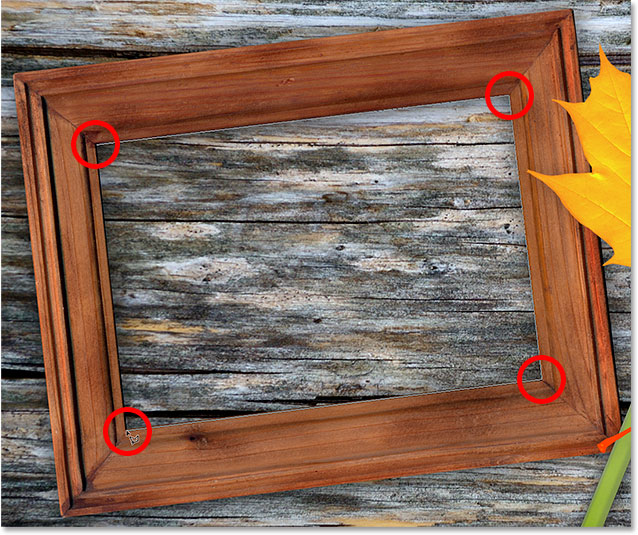
Clicking in the corners to select the photo area of the frame.
To complete the selection, I'll click one time once again on the initial point in the upper left corner, and now the surface area within the frame is selected, with the standard "marching ants" selection outline now visible:

Click again on the initial indicate to complete the selection.
Step ii: Select And Copy The Second Image
Switch over to your 2nd image (the 1 you'll be placing inside the selection) either by opening it if it's non open already or by clicking on its tab at the top of the document:
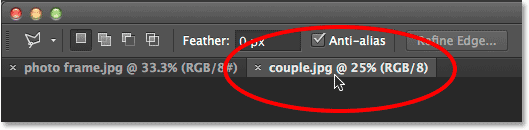
Switching to the second image by clicking its certificate tab.
Working with tabbed and floating documents in Photoshop
We need to copy this image to the clipboard and then we tin then paste information technology into the option we made in the previous image. To copy it, we first need to select it, so go up to the Select carte du jour in the Card Bar along the top of the screen and cull All. Or, press Ctrl+A (Win) / Control+A (Mac) on your keyboard:
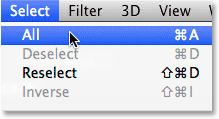
Going to Select > All.
A selection outline volition appear around the edges of the image, letting yous know it's now selected:
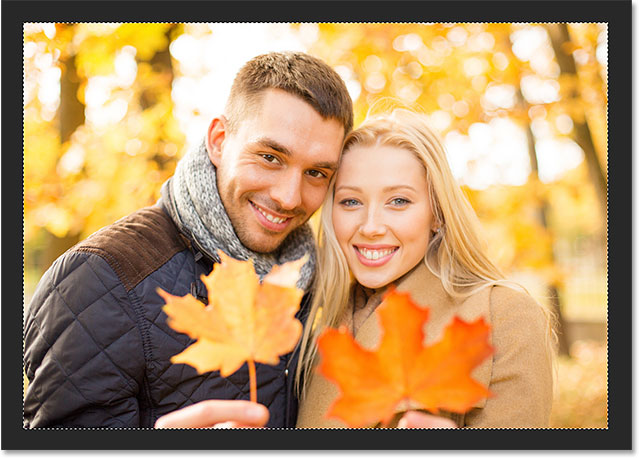
The 2d image is selected.
With the image selected, get upward to the Edit menu at the top of the screen and cull Copy, or press Ctrl+C (Win) / Command+C (Mac) on your keyboard:
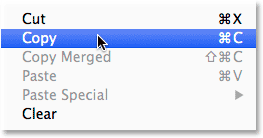
Going to Edit > Copy.
Footstep 3: Paste The 2d Image Into The Option
Switch back over to the kickoff image by clicking on its tab at the top of the document:
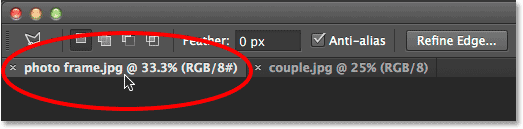
Clicking the tab to view the get-go image again.
The option we created a moment agone will still be visible. To paste the 2nd image into the pick, get upward to the Edit carte at the top of the screen, choose Paste Special, then choose Paste Into:
Going to Edit > Paste Special > Paste Into.
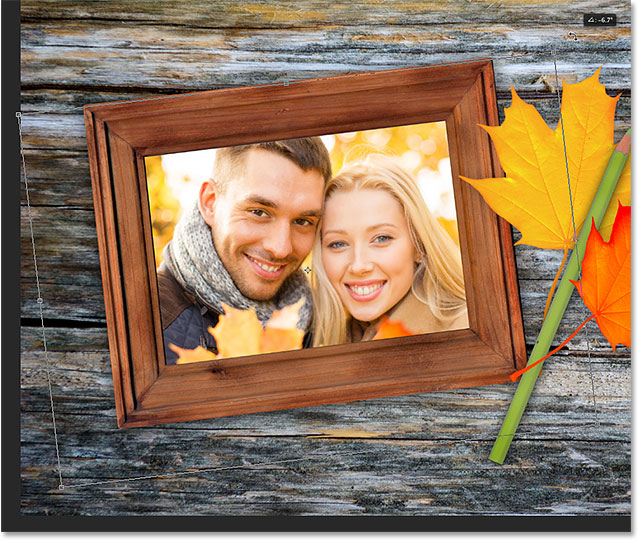
And just like that, the image appears within the selection. In my case, the epitome is plainly too large for the frame, but we'll see how to gear up that in a moment:
The effect later on pasting the second image into the selection.
Before we get any farther, though, allow'southward have a quick expect in the Layers panel so nosotros can meet what's happened. Observe that we now take two layers. The original image is sitting on the Background layer on the bottom, and as soon as we chose the Paste Into command, Photoshop added a brand new layer higher up it and placed the second epitome on this new layer:
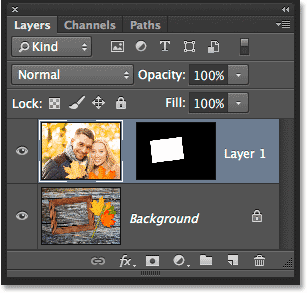
The Layers panel showing the 2d image on its own layer.
Why is the second paradigm visible simply inside the surface area nosotros selected? It's considering Photoshop used our selection to create a layer mask for the 2nd image. We can see the mask in the layer mask thumbnail. The white area represents the area where the image is visible in the document, while the black area surrounding it is where the image is hidden from view:
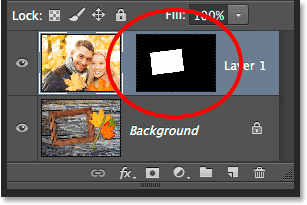
Photoshop turned our option into a layer mask to command the visibility of the second image.
Understanding layer masks in Photoshop
Step four: Resize And Reposition The 2nd Image With Free Transform
If your image is too large for the selected area and yous demand to resize it (as I practice), go up to the Edit bill of fare at the top of the screen and choose Gratis Transform. Or, press Ctrl+T (Win) / Control+T (Mac) on your keyboard to select Free Transform with the shortcut:
Going to Edit > Free Transform.
This places the Free Transform box and handles (the little squares) around the image. Note that the Free Transform box appears around the actual dimensions of the epitome, not but the part that'southward visible. If you can't run across the unabridged Free Transform box because your image is so big it's extending right off the screen, go up to the View menu at the pinnacle of the screen and choose Fit on Screen:
Going to View > Fit on Screen.
This will instantly zoom the epitome out so that everything, including the Free Transform box, fits on your screen:
The Gratis Transform box surrounds the actual paradigm, not just the small visible area.
To resize the paradigm, press and hold the Shift key on your keyboard, then click and drag any of the iv corners of the Free Transform box. Holding the Shift key down as yous drag locks in the original attribute ratio of the paradigm as y'all're resizing it so y'all don't accidentally misconstrue its shape. Here, I'grand dragging the lesser right corner inwards, but whatever of the corners will work. Brand sure (very important!) that when yous're done dragging the corner, you release your mouse key first, and so release the Shift fundamental. If you release the Shift key before releasing the mouse key, you'll lose the original attribute ratio of the image:
Dragging one of the corner handles inward while pressing and belongings the Shift cardinal.
To move and reposition the prototype inside the selected area, simply click and drag anywhere inside the Free Transform box. No need to hold down the Shift key this time. Just don't click on that little target symbol in the center, otherwise you lot'll motion the target, not the paradigm:

Clicking and dragging inside the Gratis Transform box to reposition the image inside the frame.
If you demand to rotate your epitome as well, motility your mouse cursor outside of the Free Transform box. When you see the cursor change into a curved, double-sided arrow, click and drag with your mouse. Here, I'one thousand rotating the image counter-clockwise to meliorate match the bending of the frame:
Clicking and dragging outside the Free Transform box to rotate the image.
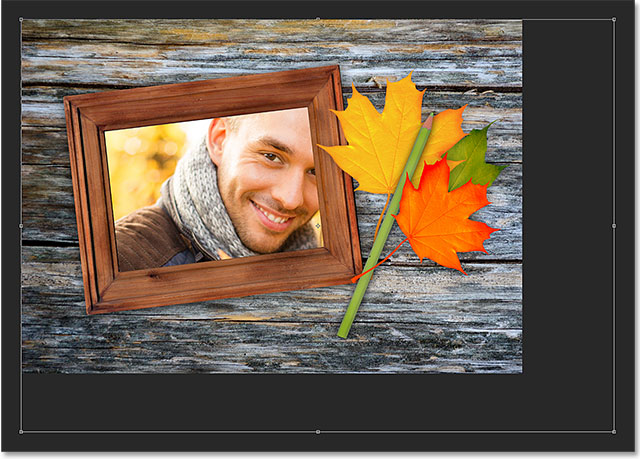
When you're happy with how the image looks, printing Enter (Win) / Return (Mac) on your keyboard to accept it and exit out of Free Transform mode:
The 2nd prototype has been moved, resized and rotated inside the frame.
Step 5: Add An Inner Shadow Layer Event
The end off the effect, I'll add together an inner shadow to the edges of the photo so it looks more than similar it'due south really inside the frame rather than looking similar someone but pasted it in in that location (which, of form, is exactly what I did). To add together the inner shadow, I'll click on the Layer Styles icon at the bottom of the Layers panel:
Clicking the Layer Styles icon.
Then I'll choose Inner Shadow from the listing that appears:
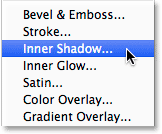
Choosing Inner Shadow from the list.
This opens Photoshop'southward Layer Style dialog box ready to the Inner Shadow options in the middle cavalcade. I'grand going to lower the Opacity of the shadow from its default value of 75% down to 40% and then it appears less intense. I'll ready the Bending to 135° then the light seems to exist shining from the upper left, although you lot may want a different angle for your image. Finally, I'll fix both the Size and Distance values to 10px. The Size option controls how far out the shadow extends from the edge, while the Distance value controls the edge softness, or feathering. The values you need will depend a lot on the size of your image so you lot may want to experiment a bit with these two options:
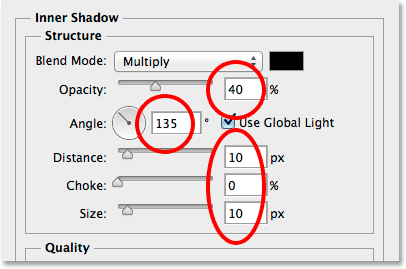
The Inner Shadow options.
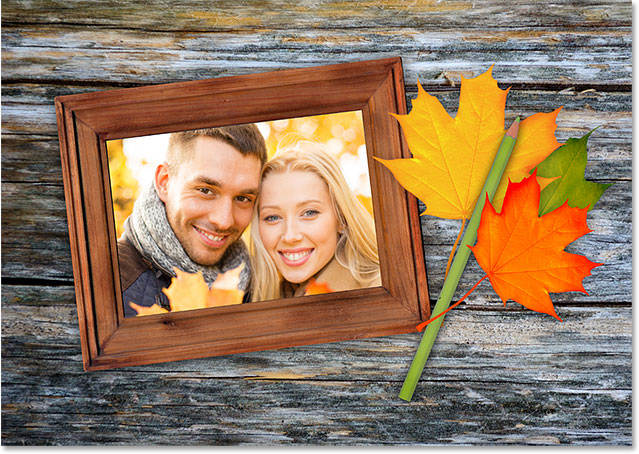
Click OK to close out of the Layer Way dialog box. And with that, we're done! Here, after adding an Inner Shadow layer issue, is my final result:
The final consequence.
Where to go next...
And in that location we have it! That's how to place one within of some other in Photoshop! Visit our Photo Effects section for more Photoshop effects tutorials.
Other Stuff
© 2022 Photoshop Essentials.com.
For inspiration, not duplication.
Site pattern by Steve Patterson.
Photoshop is a trademark of Adobe Systems Inc.
Source: https://www.photoshopessentials.com/photo-effects/placing-an-image-inside-another-with-photoshop-cs6/
Posted by: stoutsard1967.blogspot.com
0 Response to "How To Put Picture Behind Another In Photoshop"
Post a Comment